Thursday, February 14, 2013

Kneaders Sugar Cookie Love

So, been some time since I last posted.  Thought I'd share one of the sugar cookie recipes that I have on hand.
If you have ever been to Kneaders Bakery you will probably have had one of these sugar cookies.  If you've only had their healthier fare, then it's totally your loss. YUM!
I will freely admit that mine don't look as pretty as theirs do, but they are still dee-lish!
So here is the recipe:

Kneaders Sugar Cookies

2 cups butter
2 1/4 cups sugar

4 large eggs
1 cup milk

7 3/4 cups flour
1 tsp baking soda
1 tsp baking powder
1/2 tsp lemon flavor
1/2 tsp salt
1/4 tsp nutmeg
1 Tbsp honey

1. Cream together butter and sugar until fluffy.
2. Add eggs, then milk. Scrape the side of the bowl often.
3. Stir in remaining ingredients. Dough will be soft and sticky.
4. Place dough on well floured pastry cloth or workspace.
5. Knead in just enough flour to make the dough workable.  Dough will be very soft.  It is best to knead with a rolling motion so you have a smooth surface and you will not get cracks on the tops of your cookies.
6. Gently roll out to 3/8 inch thick.
7. Cut into desired shapes and place on a baking sheet lined with parchment paper.
8.  Bake at 325 degrees for 10-12 minutes or just until the edges barely start to change colors. (You can bake at 375 degrees for 7 minutes....see what works best for you.  I do the lower temp).
Makes approximately 4 dozen cookies.

Then....the best part.....ICING

4 1/2 cups powdered sugar
4 Tbsp corn syrup
3 Tbsp milk
1/4 tsp lemon flavor

1. Mix together all ingredients until smooth.
2. Dip the surface of the cookie in icing, lift out and smooth with side of palm of hand.
3. Let set.
4. Decorate with additional frosting, candy, sprinkles etc.

Notes:  If you don't like lemon, feel free to leave out the lemon from the icing.  I sometimes do.  Also, if you want candies to stick well, don't let it set too much....they won't stick.

These are great for parties because they stack well in containers.

And since this recipe makes about 4 dozen, you might just want to use containers to give them away.  Enjoy!


Wednesday, October 31, 2012

Halloween

So here is our Halloween...

It started with me sending a surprise Halloween lunch with my son.
(Thank goodness school was serving something he hated).
 We had a ghost PB sandwich, a mummy juice box (made with white electrical tape and googly eyes....(Make sure remove the straw and punch a hole through the tape or they won't be drinking your awesome creation!)
carrots, little pumpkin orange, and "pumpkin poop" (aka cheese balls) and peeps for dessert.


While my son was at school, I got to work on the house.

"X" marks the spot to the Halloween booty!

Here's what it looked like at night...
The windows were filled with orange flickering LED candles and the front window was filled with a scene of a treasure chest, gold coins and jewels, candles, books, and other pirate things.  We also borrowed some torches which we stuck in our yard and I made glass jar lanterns that we hung along the path.
And yes, we don't give out candy.  Having a sign out front really seemed to keep teenagers away this year.

But here are our final pumpkins....


Above is my son's rendition of a cannon ball splintering wood.  Pretty good considering he carved it all by himself.....with the need of a band-aid only once.


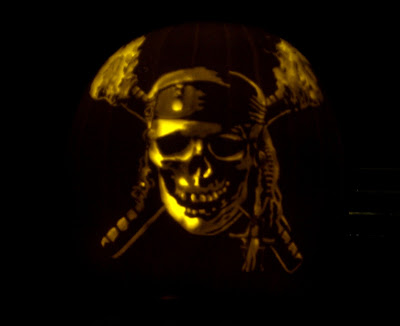
I had to re-carve my pirate ship...the other one didn't survive longer than a week...unlike the pirate skull one seen above.  (Almost 2 weeks alive, baby!)

 We put a color changing light in the pirate ship pumpkin.  It would go dark and flash a different color each time (red, blue, green, etc).  Made it look like the ship was appearing out of nowhere or that cannon fire was lighting it up.  Got lots of compliments on it.

And here is the Jack Sparrow pumpkin.  He turned out pretty well also and people thought a machine had made it.  Nope!  My blistered fingers did!  At least I'm done for another year!

Hope your Halloween was fun, too!  
Excuse me now while I go and pillage a Snickers from my kid's treat sack.  Arrrgh!


Monday, October 29, 2012

Arrrgh! There do be Halloween Pirates in this Post!

"This is Halloween....This is Halloween!"  My daughter can't stop singing those words.  Cute, but also hoping she stops after Halloween.
And this year for Halloween we are going ...
PIRATE!
(I know, we missed the bandwagon on the cool factor (though I did it when the eye-patch was in, also.  But pirates are new for the kids).

I'll have to post pictures of our trick-or-treat house when I figure out what I'm doing...and if it turns out, of course.  But since I had to carve pumpkins early for a pumpkin carving demonstration, I think I'll just share some Halloween fun early. These are the first two pumpkins. (I'm still deciding on what to do for the others).


 (The flames looks a little funky, but it's because it's on a round surface).

And below....some cute pirate children. (Don't let their looks fool you....they will pilfer all your candy).

"Candy!  Or a taste of me broadsword!"


Monday, October 15, 2012

Part Deux - Angry "Bird"day Party

So this year, it wasn't hard to come up with a theme.

Angry Birds.

They play it, they buy them in all forms. In fact, sometimes I think I know my children are part Angry Bird.  Once, when throwing their stuffed birds around the bedroom, there was a pig casualty...a glass-pig-full-of-money casualty.

So an Angry "Bird"day party in their honor wasn't too hard to settle on.

Here are the pictures!


 We did the table in bright colors.  I had planned many more elaborate things, but I had been sick the week before (Boo!).  One thing I had wanted to do was a really cool sling shot  My son (without me knowing) put the sling shot from his Angry Bird game on the table.

 This year I did make some short cuts in buying things, but for the most part I made everything.  We made cupcakes (with sprinkles in the batter so you have smatterings of color inside) topped with rich butter cream frosting and colored sugar.

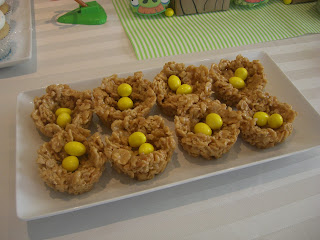
The nests are Peanut Butter Special K treats made using the cupcake pan to shape them.  I didn't use the chocolate topping and instead placed "golden eggs" inside (aka peanut m&m's).
Here is the link for the recipe.
 http://recipes.sparkpeople.com/recipe-detail.asp?recipe=5437


 The cupcakes are homemade (with sprinkles in the batter to make colorful smatterings within) and topped with a rich butter cream frosting and colored sugar.

I made the pig structure out of boxes (Capri Sun ones are a good size) wrapped in paper grocery sacks or brown craft paper.  I made it look like wood by taking a marker to it.  Super easy.
Angry Bird fruit snacks were actually a hit with all the kids.
The TNT box is a clear square container made to look crate-like using coconut wafer cookies.


The pigs I made (above) are lime jello popcorn balls.  I did add a little neon green food coloring to the sugar mix when I made it to punch up the color.  These are also super easy.  Here is a link to my favorite popcorn ball recipe: http://www.cooks.com/rec/view/0,1813,159172-228203,00.html

We also did candy bags full of more sugary yumminess. (My relatives probably hate me for giving so much sugar to their kids right before the long drive home from our house).


For the food portion of the party we made Angry Bird pizza.  You can make it homemade and put little feathers on top and all that, but it was easiest to buy a take-and-bake pizza.  I just ordered pepperoni ones and then moved the pepperoni from the tummy area and up onto the body. The I cut rounds of mozzarella cheese for the eyes (hint: fresh kind is already round in shape), and a square of cheddar cheese (cut in half) for the beak.  Add some sliced olive pupils and eyebrows.  Voila!

before baking
after baking (still looks good and everyone loved it)

This is a terrible picture, but we also decorated around the house with Angry Birds.

(Does it make the guests sitting in the chairs below targets?)

Thursday, October 11, 2012

"B" is for Birthday Parties (part 1)

So, I said I would post pictures of the un-birthday parties I have done for Ev and Princess Squiggles. Because Squiggles is young, I figured we could get away with joint birthday parties for now.  (I don't know how it will be possible when she's older. Unless my son agrees to Lego men wearing princess tiaras...)

Anyway. Last year we did the "Very Merry Un-Birthday" theme.

The Mad Hatter's hat with the date of the party
The opposite side had the party details.

The great thing about this party is that my son went along with the idea.  He thought it was cool that we were doing an un-birthday, and after showing him Disney's "Alice in Wonderland" movie, he was on board.  We went with a green (for him) and pink (for her) color palette.

We also did away with the traditional birthday cake.
 (Do you find it disgusting that we have people blow at flaming cakes?  Or is that just me?)

Anyway, here are some pictures of the dessert table we did instead.


 It was a first attempt at an Amy Atlas-inspired table spread in the pinks and greens we chose to go with.

I really considered making an Alice in Wonderland inspired cake with multiple tiers.  You know, the bright and colorful ones where it looks like the tiers are tipping.? Very whimsical.  However, I didn't feel really up to the challenge.
 Instead.....

......yup, Hostess cupcakes.  They did fit the bill though.  They looked like the ones I remember seeing in one of the many Alice movies.  Plus, being cheap and easy?  Totally.
I


 For the rest of the dessert table, we did other little baked confections that one might see at a tea party.  We had various cookies, donuts, and candy.

(We also had sandwiches, but you won't see them here on the dessert table).

For drinks, I had found little glass teacups at the D.I. (aka goodwill).  I bought twelve of them, no two being the same in design.  I plan on re-using them for other parties and bought little tasting spoons so I can put puddings or other small tasting items in them. (At least, that's what I told my husband (and myself)).


Friday, October 5, 2012

"A" is for Apples...

The letter "A" comes first, so I thought it might make a good title for this entry. An entry that begins (for all intents and purposes), a new blog. (It has, after all, been 3 years?)

I had originally thought about doing ""A" is for Angry Birds" and would have posted pictures of the most recent un-birthday party I did for my two kids, but apples are what I'm currently contending with.
(No fear. I'll share the Angry Bird party love in another post).

But as I said, APPLES. Our tree was supposed to take a break this year, but apparently some industrious bees helped pollinate it. And thank goodness!
This year's crop turned out wonderful and we didn't lose as many this year. (We do the organic apple thing).

So, when our tree produces, we eat apples till we don't want to look at another one, and then dry the rest. So I thought I'd share my favorite drying tips.

Here's what you'll need:

  • Dehydrator (however many trays you want. I only have 4).
  • Apple peeler (I know there are fancy-shmancy ones....I just use a veggie peeler).
  • Apple slicer (or knife, or food processor)
  • Corer
  • Pineapple juice
  • Cinnamon-sugar
  • Wax Paper
  • Plastic bags

First, wash your apples in soapy water.
Dry.
Peel your apples and core them. (Apple core....Baltimore...who's your friend...)
Cut one side of the circle of the apples (so they look like apple donuts).
I do my apples 1/4" to 1/2" thick depending on how long I have to let them dry. I am NOT getting up at 3am to check apples.

Dip apple slices into a bowl of pineapple juice. (You can use lemon juice, but pineapple is yummy). Have another bowl with a colander in it to let the apples drain off the juice. (You can use the drained juice for more apples).
Lay your apples on your dehydrator tray, making sure they don't overlap.

Sprinkle one side of the apple with cinnamon and sugar.


Dry for 3-4 hours. (My dehydrator recommends 135 degrees).
Turn the apples over and dry another 3-4 hours. (Really, it depends on how many trays you use. So check them. They will continue to dry more after you are done. You just don't want them to be wet. You also don't want them to go too long. They have a tendency to stick to the tray if you do. You can continue drying them out on the wax paper).

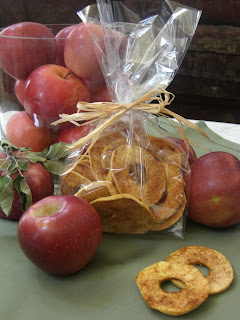
When the apples are done, put them in plastic bags and hide them. (No, seriously...they are addicting).

They also make for good gifts.


As after-school snacks...

                                                         ...or glasses, apparently.


Anyway, have fun!

Wednesday, July 8, 2009

Summer Ketchup

Ev thought that when I said, "Mommy's playing catch-up on her blog," that I said, "Mommy's playing ketchup on her blog".

Catchy title, I thought. Perhaps enough to get people to look at boring family photos. Plus, if I started with "summer: part 1" like everyone else, I may soon
find myself with "summer: part 263"

So here's a brief photo hi
story of the start of our summer - in May.
(You did catch that I was behind, right?)


Well, courtesy of the grandparen
ts, we took a vacation to southern California.

We went to the largest hu
man-trap ever set by a mouse. It was great and Ev loved it there.
What am I saying? I loved it there! (Yeah, kind of a freak for that place......but I get it from my mom).


We had lots of fun and Ev was able to go on almost everything. He says that he loved the Matterhorn the best, but I think Splash Mountain was a close second considering how many times we went on it.

Here we are the first time we went on it (with my brother-in-law and his daughter in front). (If you can see it very well).
And here is how soaking wet we were after riding it more than a few times right before closing. Ev was cold and became a miniature dark sith lord in my hooded black jacket. "Your [Disneyland] training is now complete."
We also visited California Adventure.
Everett rode some bugs,

watched some bugs,

and found Wall-E.


And here is Universal Studios.


Here is Ev's "red carpet" pose.


And here are the boys "monkey-ing" around.

The favorite place there was Curious George's ballroom where there is a continuous ball fight taking place. I only have videos of that place, but they are choosing to be uncooperative.


Another one of our stops was to Seaworld, but I guess big fish aren't exciting enough to warrant pictures...at least that's what my camera seems to think cause I know I took some there.
Oh well, I'm sure y'all are pictured out anyhow.

Maybe I'll be good and go another three months before posting more of them.

Maybe.